
26 June 2020
Do you really want to filter internal traffic?

Many organisations set up their analytics platform to exclude activity from internal users by filtering activity based on the user’s IP address (Adobe documentation, Google documentation). By excluding these users, analysts can focus purely on customer activity or other external users. In addition to excluding internal users, many organisation also exclude activity by:
- Business partners such as media agencies, web developers and analytics support partners
- Automated tools including website performance monitoring, tag auditing and mystery shopping
Recommended best practice is to configure one view (Google) or report suite (Adobe) as a raw unfiltered view and to set up the primary production reporting based on filtered views/report suites. Some businesses go a step further and configure an additional set up showing only the internal traffic.
Limitations
However, there are a number of limitations with this approach:
-
It can be a blunt tool
Some business partners can be large organisations with thousands of staff, of which only a small fraction are actively working on the business while, the vast majority of other users may be legitimate customers that are being excluded unnecessarily. In these cases, analysis would be more meaningful if it included some of the filtered data. Using the typical set up, data either with no filters or with all filters would be visible, but not data with selective filters applied. For example, if you wanted to hide the internal users and automated tools but also include business partners and the general public. Please note that workarounds involving multiple views or report suites are available but this adds to the maintenance burden.
-
Maintenance burden
Businesses tend to add new exclusions over time. An obvious example is if a new media agency is appointed, their IP addresses would be added to the exclusions list. However, often the IP addresses of the old agency remain in place. This can easily happen if the documentation of what each exclusion is related to is misplaced or lost.
-
Data exports for Google Analytics 360 (GA360)
GA360 offers a feature to export hit level data (i.e. every page view and interaction that is being tracked) into Google BigQuery allowing for types of analysis that cannot be carried out within the user interface alone. The limitations with the integration mean that the client must choose between having access to the unfiltered data set (the Google recommendation) and a filtered one.
Solution
The approach proposed in this article is to label the traffic rather than just filter it and addresses most of the limitations discussed above.
Traditional approach - filtering traffic
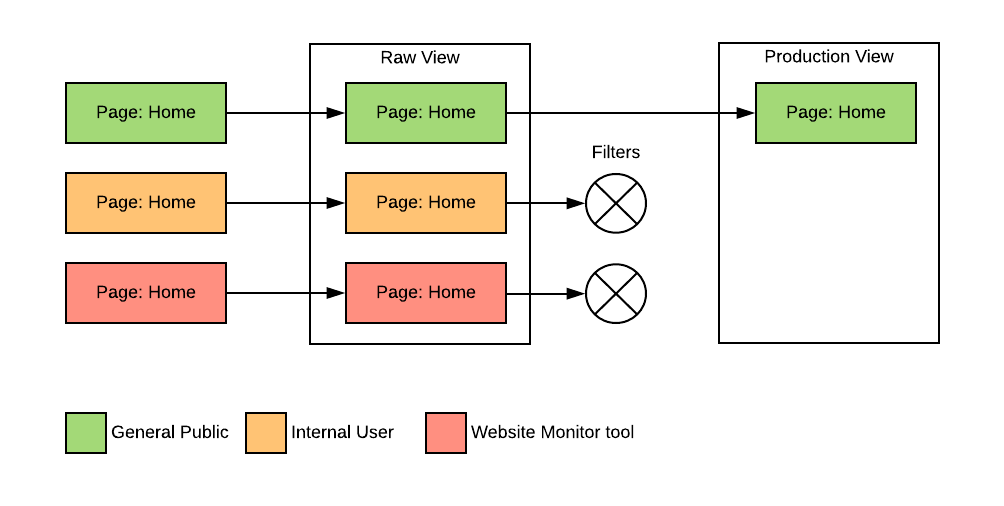
Traffic is filtered based on the IP address of the visit. Here internal users and a web monitoring tool are dropped from the production view.
Recommended approach - labelling traffic
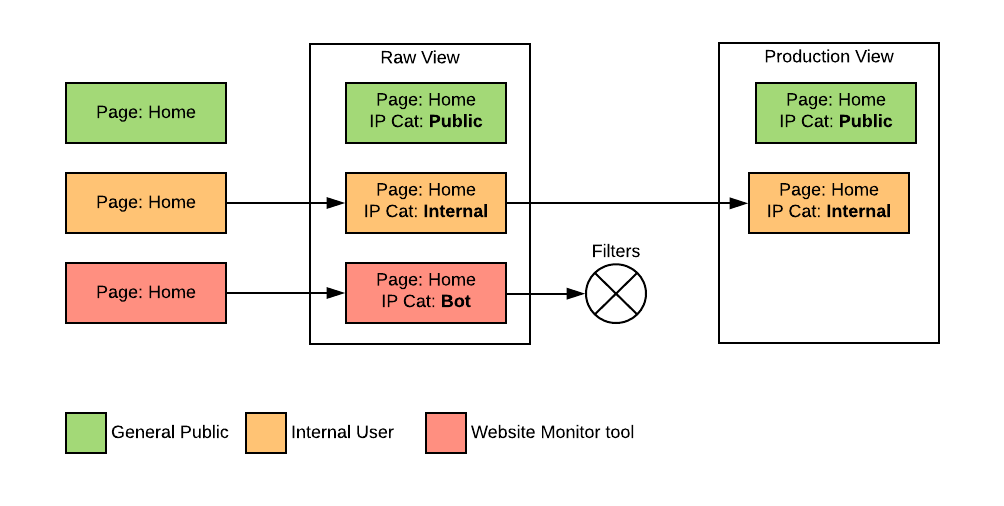
Traffic is labeled (IP Cat) based on the IP address, which is saved in a custom dimension or evar. This approach enables the use of other features, such as segmentation, in the analytics platform to decide whether to include or exclude some types of traffic in reporting. The business may decide to adjust which traffic is filtered from production views accordingly and they can, of course, also retain all existing filters.
The unfiltered view now includes labelling for all traffic, making it easy to identify which activity has been excluded from the production views.
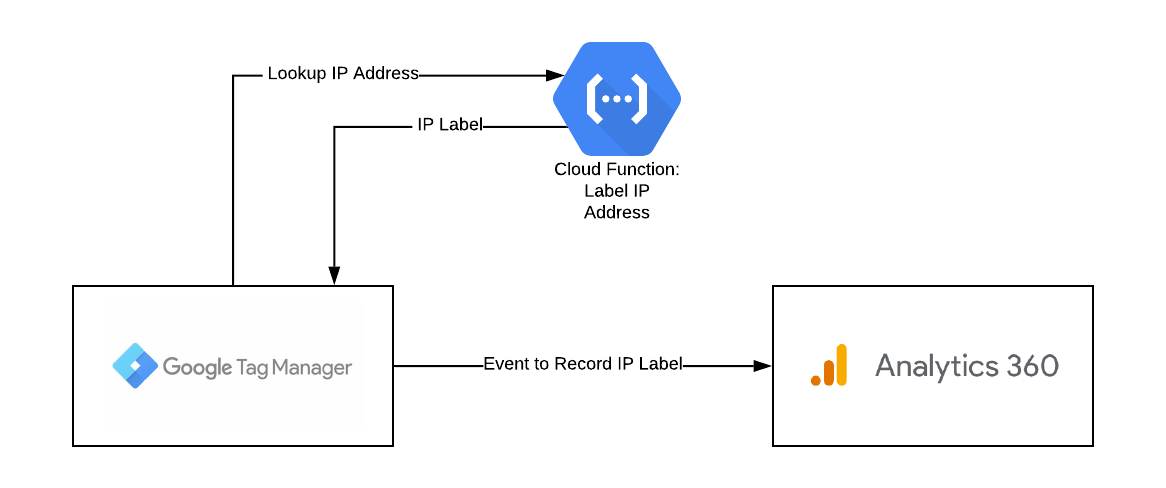
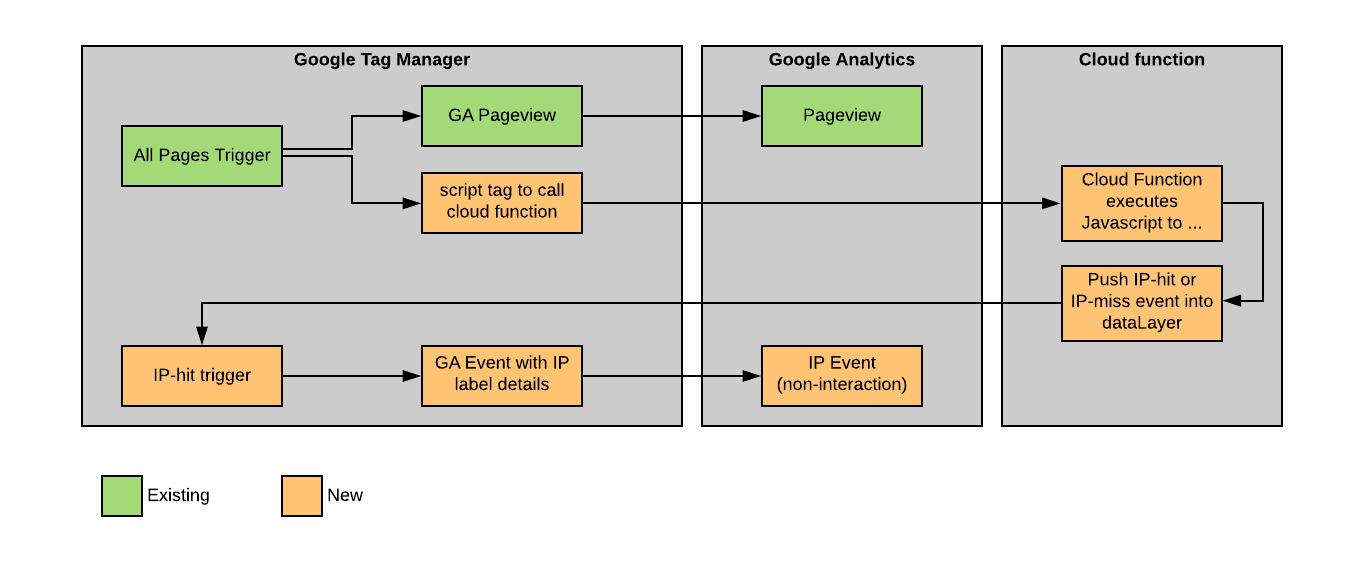
As the user’s IP address is not directly available in the browser, the labelling will be completed using a Cloud Function. The remaining sections of this guide will explain the steps to create this.
The high level architecture will look like this:
Create the Cloud Function
Complete these steps to install the Firebase CLI.
Then, use CLI to login:
$ firebase login
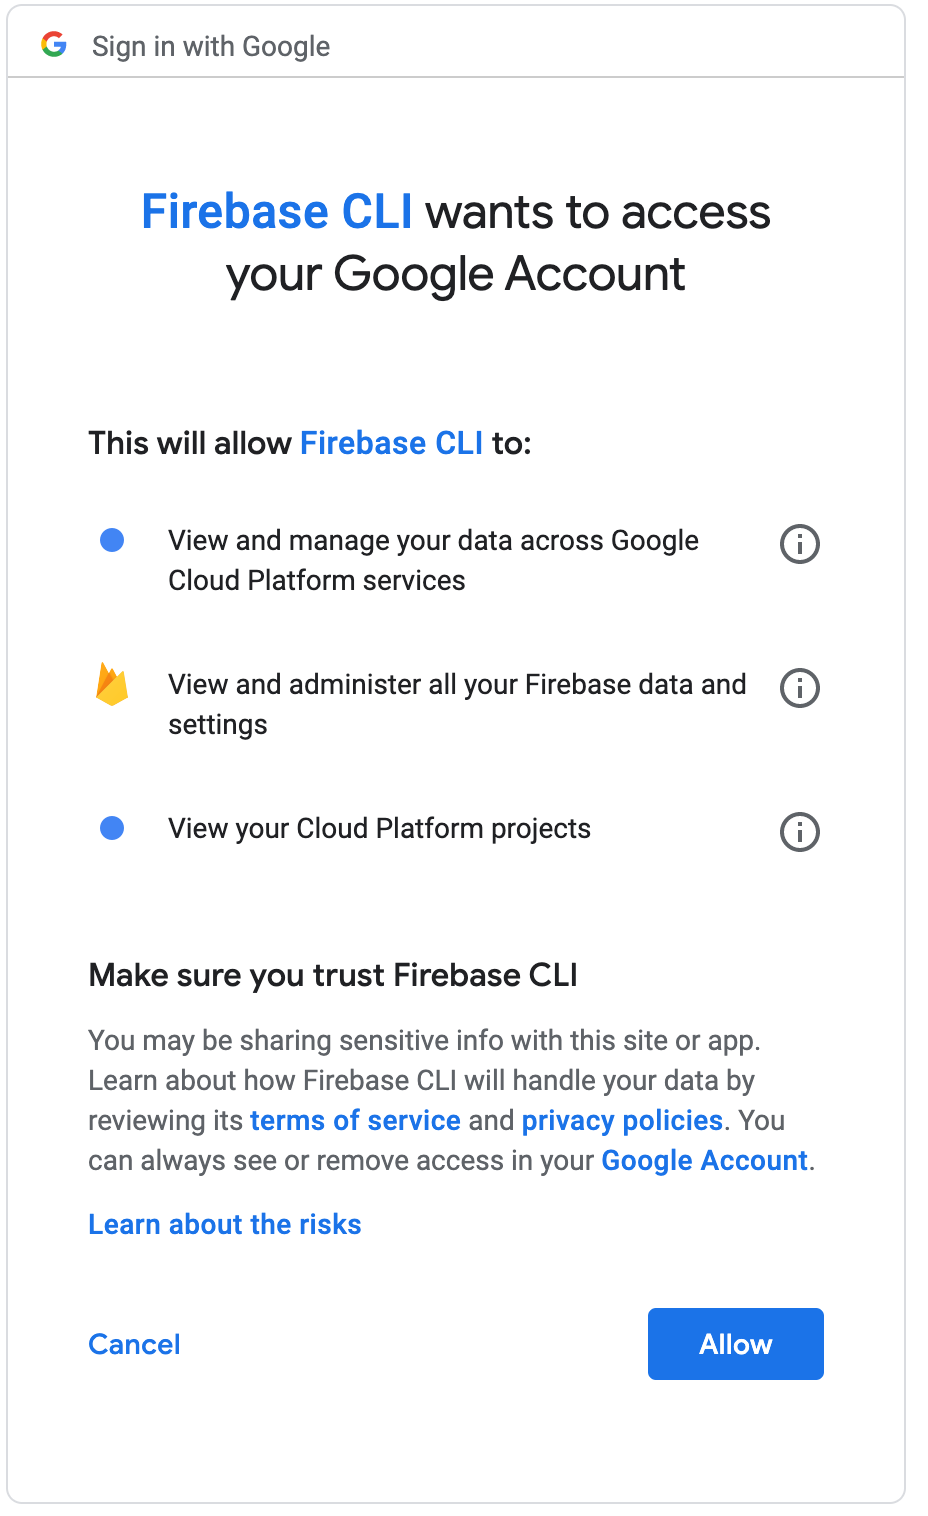
Follow the instructions and authorise the Firebase CLI when prompted.
Create a project directory and initialise for Cloud Functions:
$ mkdir ip-label
$ cd ip-label
$ firebase init functions
At the prompt, “Which Firebase CLI features …”, select, “Functions: Configure and deploy Cloud Functions” and “Hosting”
Then select, “Create a new project”
You will then be asked to, “specify a unique project id…”. For example mycompany-ip-label and a “project name”. You can accept the default, which will be the same as the project ID
Next, you will be prompted, “What language would you like to use to write Cloud Functions?” Select the javascript option, then select the default option of no to ESlint. You should see something along the lines of:
✔  Wrote functions/package.json
✔  Wrote functions/index.js
✔  Wrote functions/.gitignore
Select yes to installing dependancies. After some time installing, you should see:
i  Writing configuration info to firebase.json...
i  Writing project information to .firebaserc...
i  Writing gitignore file to .gitignore...

✔  Firebase initialization complete!
Now, add hosting into project:
firebase init -P mycompany-ip-label hosting
Replace mycompany-ip-label with the project name used above. Accept the default options for other questions. When it is complete you should see:
i  Writing configuration info to firebase.json...
i  Writing project information to .firebaserc...

✔  Firebase initialization complete!
You are now ready to begin writing the function.
Write the Cloud Function
DISCLAIMER: This is only example code and not thoroughly tested in production. Always conduct your own QA processes before pushing to production.
First, you will need to edit index.js in the functions folder. Initially it will look something like the below:
 const functions = require('firebase-functions');

  // // Create and Deploy Your First Cloud Functions
  // // https://firebase.google.com/docs/functions/write-firebase-functions
  //
  // exports.helloWorld = functions.https.onRequest((request, response) => {
  //  response.send("Hello from Firebase!");
  // });
Add some functionality:
const functions = require('firebase-functions');

// add in express to make routing cleaner (...)
const express = require('express');

// use a libary to figure out the requesting IP
// no point in re-inventing this
// https://www.npmjs.com/package/request-ip
const requestIp = require('request-ip');

// define which IP addresses to label
// for testing purposes you may want to add your
// ip address in - a web serach for "what is my IP"
// should let you know what your current IP address is
const config = {
  "100.100.100.100": { "ip_category": "internal", "ip_label": "office-syd" },
  "100.100.100.120": { "ip_category": "internal", "ip_label": "office-mel" },
  "200.200.200.200": { "ip_category": "bot", "ip_label": "datadog" },
  "1.2.3.4": { "ip_category": "internal", "ip_label": "my-test"},
}

// setup the express app
const app = express();

// handler for the root route
app.get('/', (req, res) => {
  // get the users IP address
  const ip = requestIp.getClientIp(req);

  // respond as javascript
  res.type('.js');

  // lookup the ip address in the config
  var ip_class = config[ip];

  // handler for GTM
  // if ip address is listed push an ip-hit event
  // into the dataLayer together with the ip details
  // otherwise send an ip-miss event into the dataLayer
  if(ip_class) {
    ip_class.event = "ip-hit";
    res.send("dataLayer.push(" + JSON.stringify(ip_class) + ");");
  } else {
    res.send('dataLayer.push({event:"ip-miss"});');
  }
});

// export the function
exports.app = functions.https.onRequest(app);
Edit the firebase.json in the project root. This will set up the project to map the root url to the Cloud Function. It should resemble the below:
{
  "hosting": {
    "public": "public",
    "ignore": [
      "firebase.json",
      "**/.*",
      "**/node_modules/**"
    ]
  }
}
It is necessary to include a section to redirect to the Cloud Function. Add lines 4-7 that redirect, or rewrite, requests to the Cloud Function created above to give the following firebase.json:
{
  "hosting": {
    "public": "public",
    "rewrites" : [{
       "source": "/",
       "function": "app"
     }],
    "ignore": [
      "firebase.json",
      "**/.*",
      "**/node_modules/**"
    ]
  },
}
For additional information, there is a video running through Firebase Hosting / Functions
A tidy up is required to remove the default index page:
$ rm public/index.html
Install the dependencies:
$ npm install express --save
$ npm install request-ip --save
Deploy the Cloud Function
The function is now ready to be deployed:
$ firebase deploy

=== Deploying to 'mycompany-ip-label'...

i  deploying functions, hosting
i  functions: ensuring required API cloudfunctions.googleapis.com is enabled...
✔  functions: required API cloudfunctions.googleapis.com is enabled
i  functions: preparing functions directory for uploading...
i  functions: packaged functions (27.98 KB) for uploading
✔  functions: functions folder uploaded successfully
i  hosting[louder-ip-label]: beginning deploy...
i  hosting[louder-ip-label]: found 1 files in public
✔  hosting[louder-ip-label]: file upload complete
i  functions: updating Node.js 8 function app(us-central1)...
✔  functions[app(us-central1)]: Successful update operation.
i  hosting[louder-ip-label]: finalizing version...
✔  hosting[louder-ip-label]: version finalized
i  hosting[louder-ip-label]: releasing new version...
✔  hosting[louder-ip-label]: release complete

✔  Deploy complete!

Project Console: https://console.firebase.google.com/project/mycompany-ip-label/overview
Hosting URL: https://mycompany-ip-label.web.app
$
Test by opening the hosting url (https://mycompany-ip-label.web.app) in your web browser. If you included your own IP address, you should see something similar to the below:

Congratulations! You have deployed a firebase Cloud Function 🎆
The next step is to the complete the set up in Google Tag Manager.
Configure Google Tag Manager (GTM)
Configure GTM to fire an extra (non-interactive) hit when the user’s IP address is listed for labelling. The following diagram shows an overview of the GTM implementation:
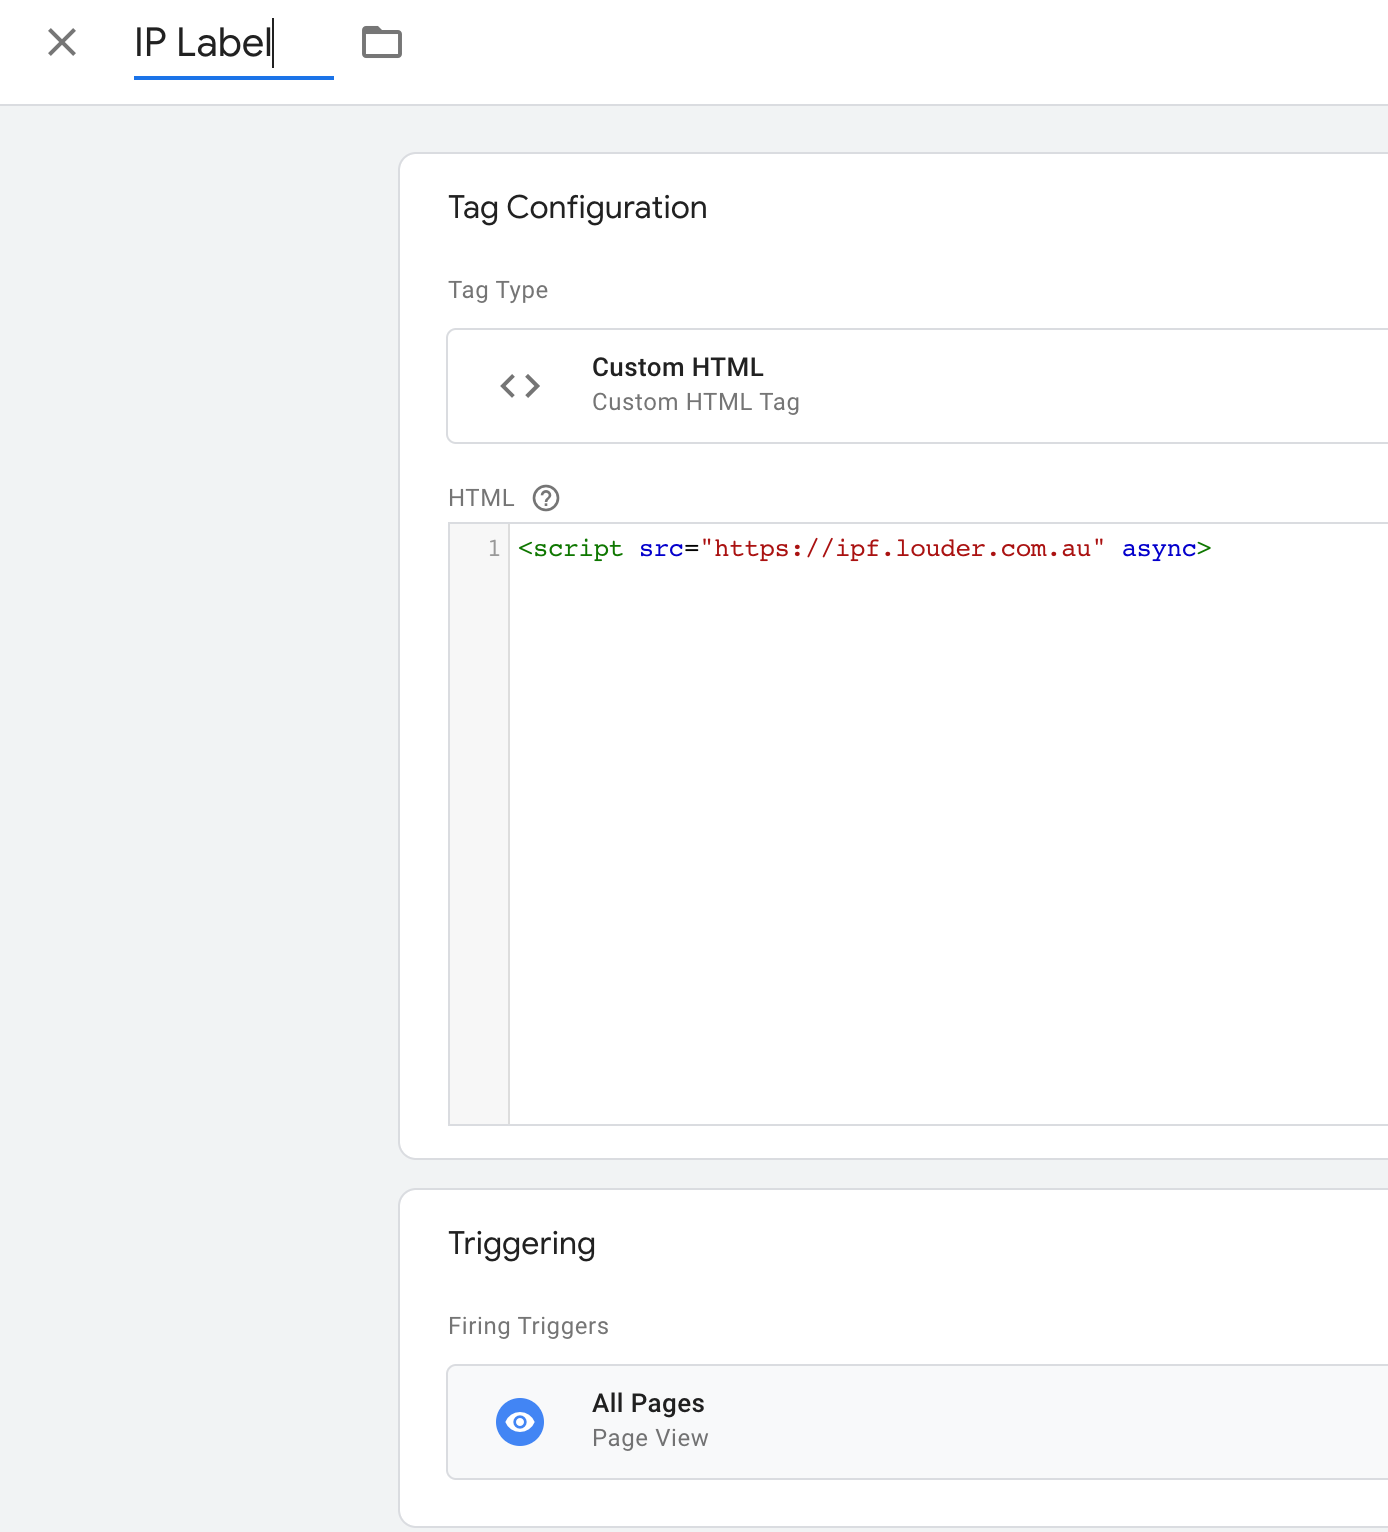
Call the Cloud Function
Create a new tag to call the new Cloud Function. Use a custom html tag to call the function and execute the response as javascript. This will be set to fire on all pages.
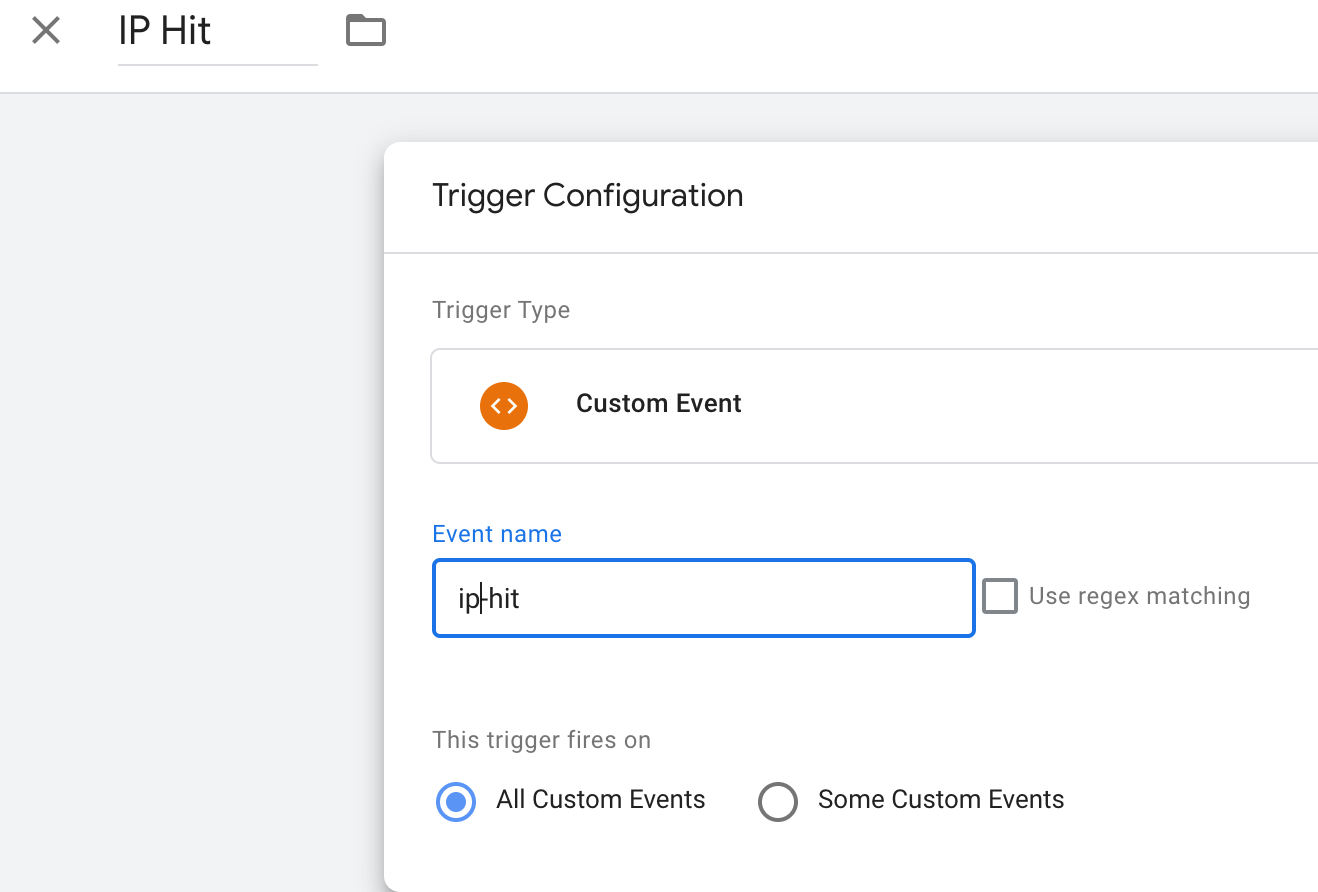
Look for IP matches
Next, create a new trigger on the event that is pushed when a labeled IP address is found.
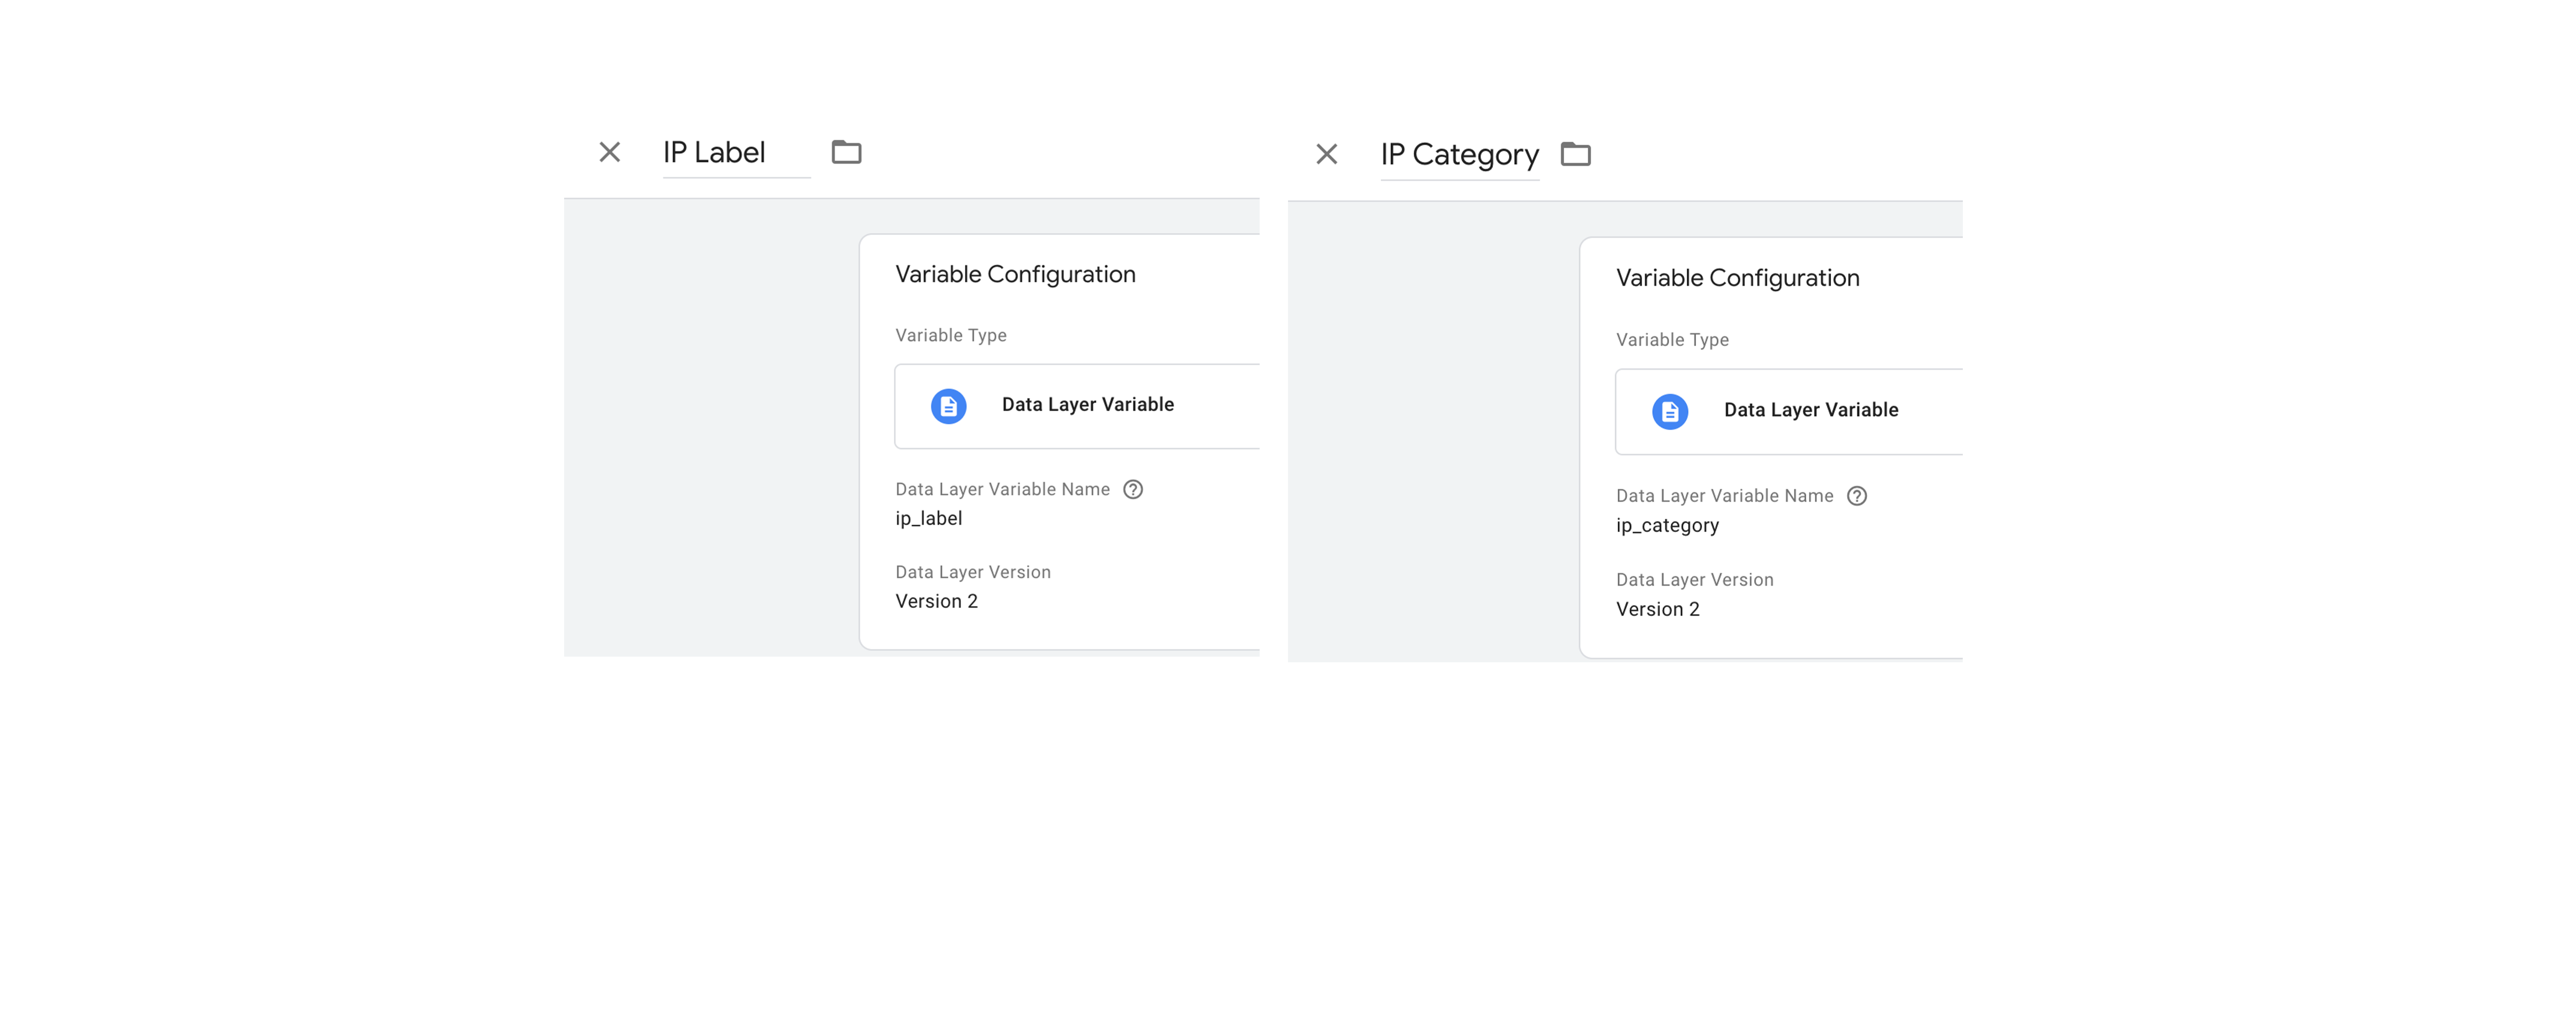
Get the labelling information
Create variables for the IP Category and Label:
Send the data to Google Analytics
Finally, create a new GA (non-interactive) event to store the traffic categories:
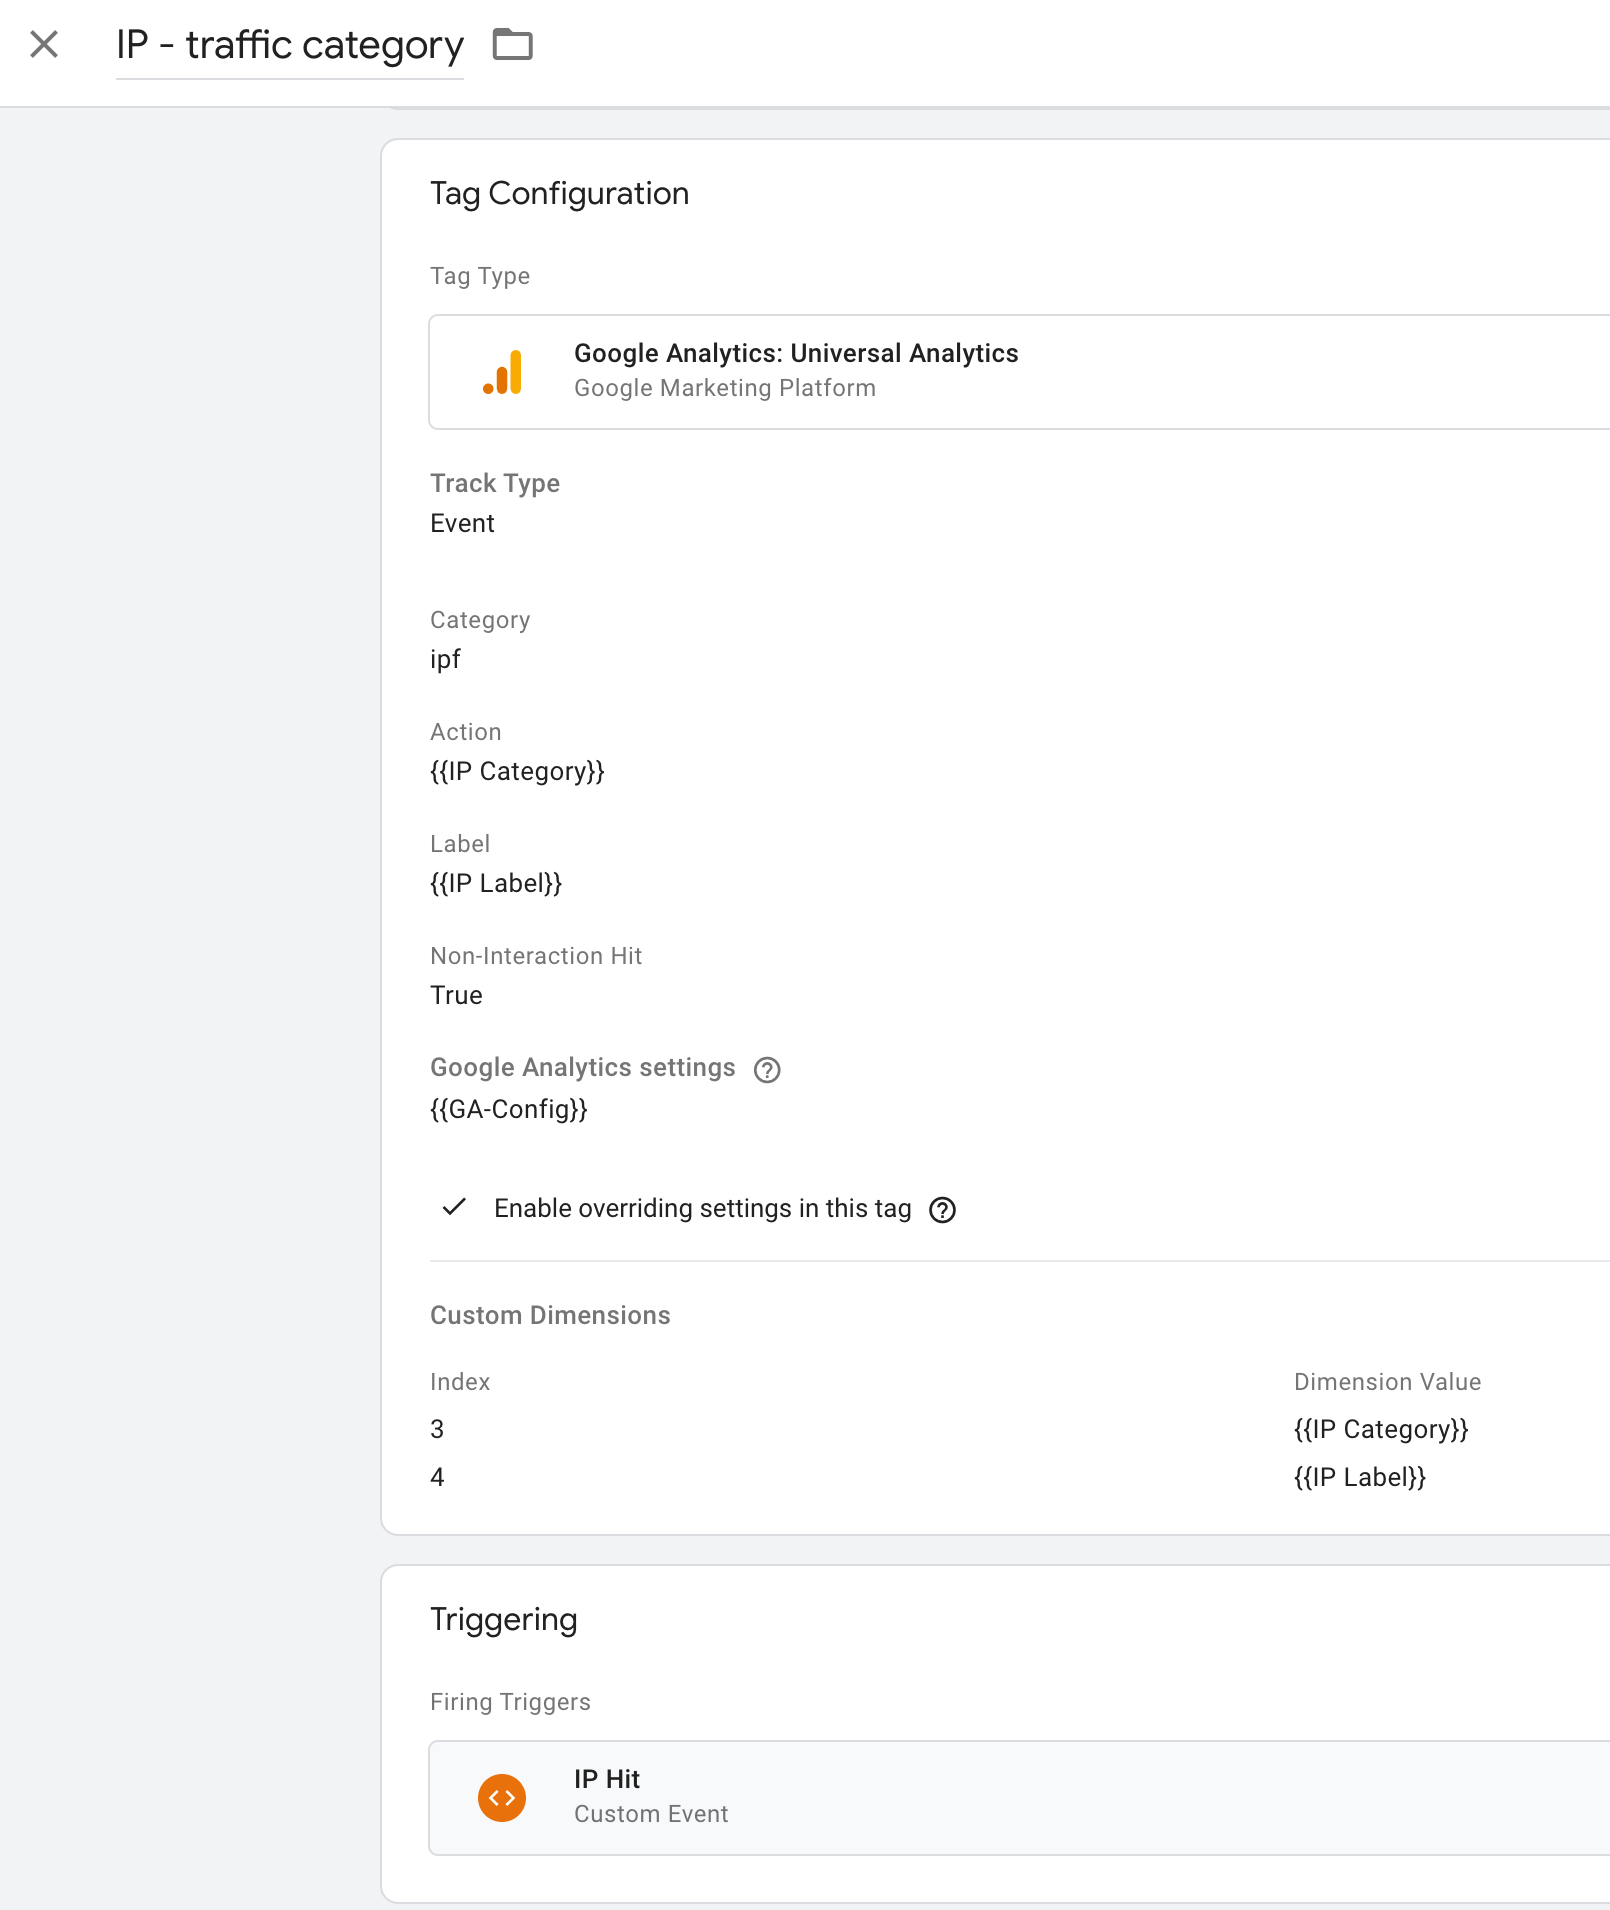
Test in preview mode. You should see an additional event fire for configured IP addresses.
When you are happy with the testing, you can deploy the changes.
Use the data in Analytics
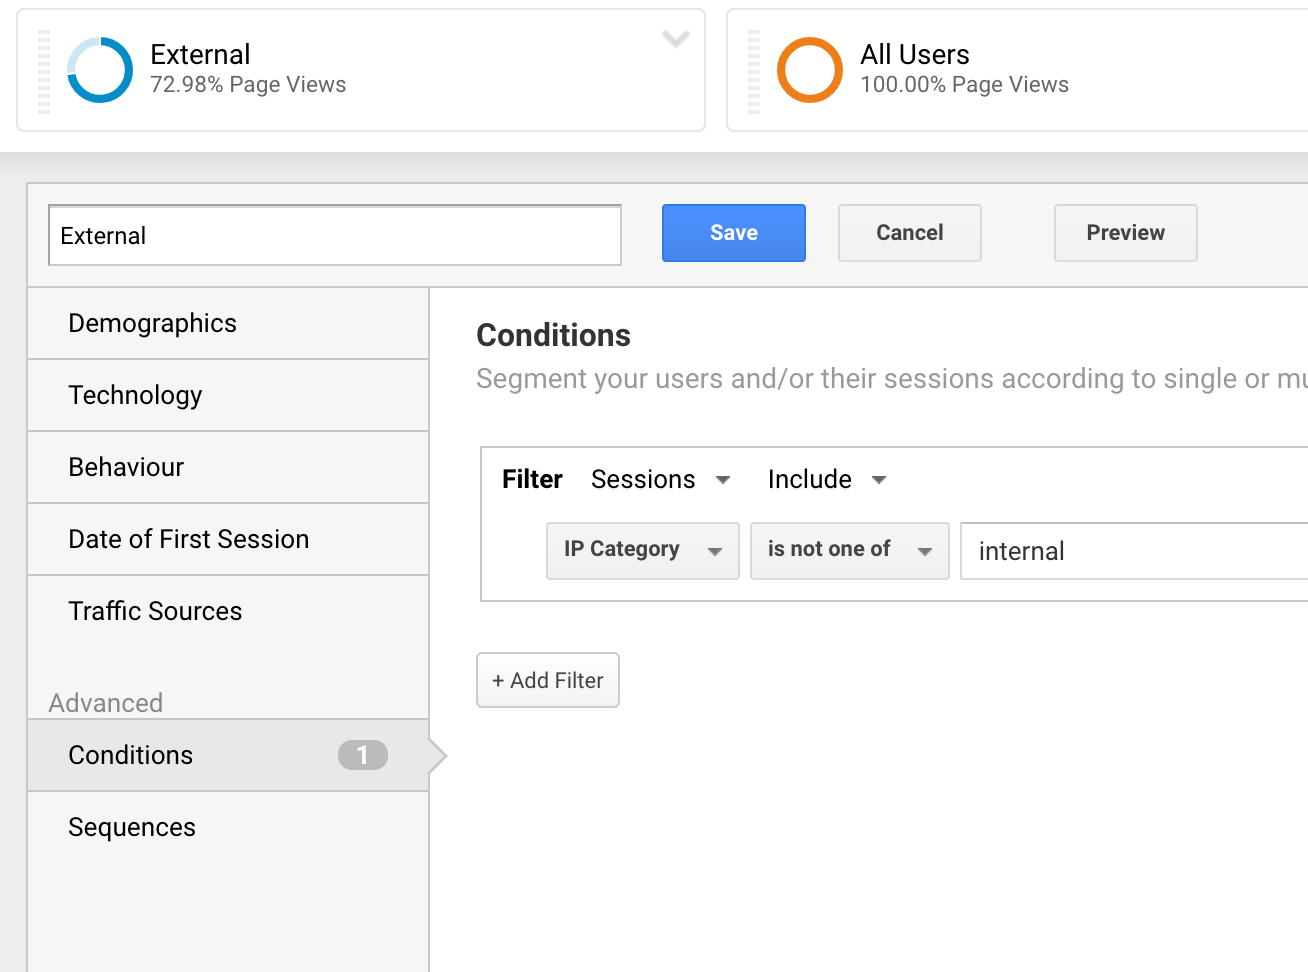
Now that you have collected labels for the internal traffic, you can use standard analytics features such as segments to demonstrate the impact.
The images below show how to create a segment for external users and also how this can be used to inform; the graph displays the increase in activity on 17th was due to internal users.

To summarise and address the earlier limitations
With a functioning solution in place, we can revisit the limitations raised at the beginning of the article.
-
The blunt tool ✅
You can now use segments, or report/analysis filters, to look at data for each type category of IP address that would have previously been filtered.
-
Maintenance burden ✅
Since you can see the labels coming through in the analytics reports, it will be more apparent that data relating to former partners is being inappropriately treated.
-
Data exports for GA360 ✅
Now that the raw data set includes labels for traffic that is considered internal, it is possible to use the raw data export and build queries that replicate the impact of IP filtering.
There is even an added bonus
Now that the IP category is active in GTM, it can also be used in other tags. For example, you can build a floodlight audience that can be used as an exclusion list across paid marketing activity for any internal users or partners.
What costs are involved?
Good question! That will depend on traffic levels and whether the Cloud Function is called for every hit, as you can also choose to cache the result for a session.
At the time of writing, the current pricing allows two million free invocations each month with a cost of US$0.40 per million thereafter.
You will also need to consider GA hit limits along with your current GA contract and usage levels, as the outlined approach will send additional hits to GA for any matched IP addresses. If hit limits are an issue, an alternative configuration could be implemented to delay sending the page view until the IP label is returned.
What are the next steps?
As this is a proof of concept, there are plenty of areas to further develop and refine including:
- Support for partial IP matches, e.g. starts with or regex matches
- Create a user interface for managing IP address labelling
- Support for implementations that are using a non Google tag manager and have implemented analytics via gtag.
- Support for Adobe Analytics/Launch
About
Ian Kenney
Ian is a Consultant and Partner at Louder and has been working with data and analytics since it was invented. He enjoys all things code.