
08 June 2021
How to fix the Google Cloud Platform’s scheduler using Airflow

Internally, Louder use BigQuery’s Data Transfer Service in order to build reporting tools for clients that need them and supply our invoicing system with the data it requires to bill said clients for their platforms usage. However, we’ve had an issue with the Google Cloud Platform’s (GCP) built-in scheduler for some time now.
In more time sensitive scenarios, such as pacing sheets and bid strategies, these transfers have failed to be an adequate solution. Not due to the quality of the data, but because of the lack of consistency we have experienced from the GCP’s scheduler.
Since these transfers were firing seemingly whenever they wanted to, we started to search for a solution that led to this - what if we wrote some code that ran the Transfers now?
This might seem counter intuitive but, if this code was executed using a third party scheduler, we would no longer need to rely on the native scheduler in the GCP. Instead, we could lean on the third party scheduler (in our case, Apache Airflow) to kick off our Transfers at a specified time each day. Since Airflow is capable of running tasks at the time we want them, we once again were able to automate Data Transfers.
But this time, we got the right data at the right time.
How did we achieve this?
With a little Python magic…
To kick off the BigQuery Data Transfers remotely, we used the google.cloud.bigquery_datatransfer_v1 Python library.
Specifically, the google.cloud.bigquery_datatransfer_v1.types.StartManualTransferRunsRequest and the google.cloud.bigquery_datatransfer_v1.services.data_transfer_service modules.
From this library, we created a Class containing all of the functions we needed to kick off our Transfers. But how exactly do you kick off a Transfer using this library?
The process
-
Authenticate against the Transfers API
-
Get a list of Transfer configs for the Transfers you want to kick off
-
Use the
StartManualTransferRunsRequestmethod to kick off one of your Transfers -
Poll for the result of the request and wait to see the response
There are a few steps to writing the code in a fashion that can be automated. So let’s address each step of the process, and how you can make the code do all the work for you.
Authentication
Usually, authentication can be quite troublesome. Thankfully, authenticating against the GCP is a fairly straightforward task that can be broken down into three key areas:
-
Create a Service Account
-
Generate a key file
-
Set the credentials in your environment
Firstly, create the service account from which you intend to run this code. While I do not recommend doing so for production, you can use the App Engine default service account to test the code. Either way, this service account will require the BigQuery Data Transfer Service Agent role.
Next, generate a credentials JSON file for the service account you created. This will be how you authenticate against the API. To do this:
-
Navigate to IAM & Admin
-
Then, Service Accounts
-
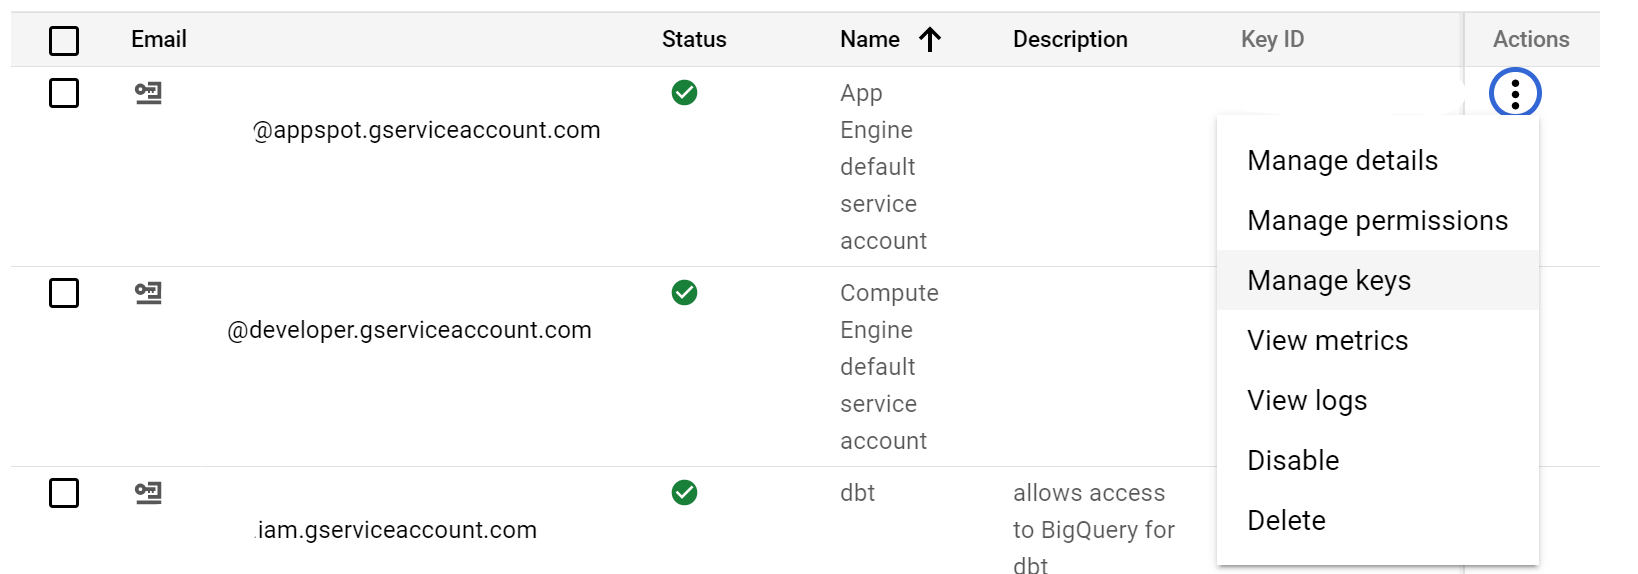
Click the three dots under Actions, and select Manage keys
-
Click the ADD KEY drop down and select Create new key
-
Select the JSON format, and click CREATE (this will download a JSON formatted key file)
These key files should be stored in a directory called something similar to .gcp_credentials, within your home directory. This will allow you to easily find them again in the future, rather than having to scour your Downloads folder.
Now that the credentials file is ready and there is a service account to run the code from, you need to use the file to authenticate yourselves against the Transfers API. Fortunately, the GCP libraries can detect your credentials if you export them to the environment as GOOGLE_APPLICATION_CREDENTIALS. For this use case, we will create an environment file called .env. It should look like the below:
export GCP_PROJECT_ID="your-project-id-here"
# not required but best practice to add here

export SERVICE_ACCOUNT="project@appspot.gserviceaccount.com"
# email address of service account

export GOOGLE_APPLICATION_CREDENTIALS="/home/users/you/.gcp_credentials/file.json"
# path to your service account credentials file
Once created, you can export these environment variables by using . .env. Now, when you use any of the Transfers Python libraries, you will be authenticated.
Listing Transfers
As stated above, a list of the Transfers will be required. But more specifically, a piece of information from the Transfer’s metadata is necessary. While you can take this from the “configs” portion of URL of each Transfer, it is far more efficient to write some code that gets this information for you.
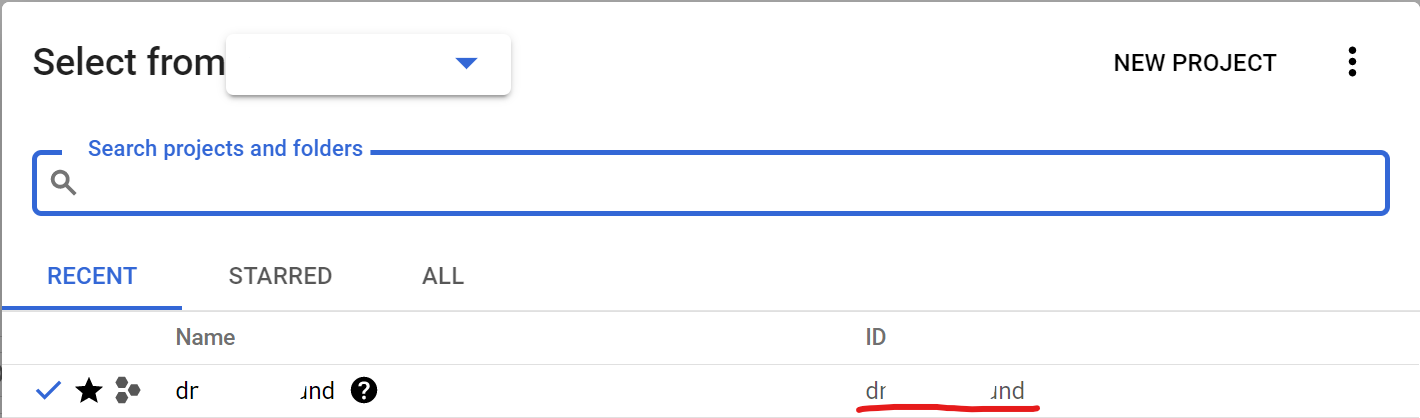
You can do this using the list_transfer_configs() method of the DataTransferServiceClient() module. All that’s required for this is a project path, which can be obtained using the common_project_path(GCP_PROJECT_ID) method of the same module. You need to ensure you pass in your GCP project ID, which can be found in the GCP user interface, as shown below.
This method will return a list of Transfer objects, from which you can pull out the required metadata using transfer.name, where transfer is the variable name for the request’s response. You can also use this method to determine the status of the Transfer, using transfer.state.name, which will be quite useful later.
Making the request
Now, for the easiest part of the code - making the request to kick off your Transfer. Using the StartManualTransferRunsRequest() method, create the request body. It takes two parameters - parent, which is one of the transfer.name objects collected in the previous step, and requested_run_time, being the time to kick off the Transfer. Note that this is not the date to collect data for, but instead the time to kick off the Transfer.
There are some interesting rules for the run time parameter, so I would suggest creating a protobuf Timestamp() object for the time of the code’s execution. This can be done using the datetime library.
With the request body built, next, make the request by using thestart_manual_transfer_runs() method. This takes two parameters, the newly created request body, and a timeout in seconds. We used 360 seconds, as it is more than enough time for the Transfer to complete, but feel free to experiment here.
Now that the request has been made, you could leave it here, and just iterate over each Transfer config that gets returned from step 2 to make a request for all of them. However, a big benefit of using Airflow as a scheduler is the monitoring on task status. As it stands, there is no way of knowing if the Transfer has successfully run, and this is where the final bit of code comes in.
Polling for status
As the list_transfer_configs() method lists all available Transfer details, it is sensible to kick off all of your Transfers before polling for their statuses. This means that they will run in parallel rather than in series, which would take a considerable amount of time.
As mentioned earlier, when we were getting a list of Transfer configs, you can return the status of the Transfer in the same way. The same function written above can be utilised and run in a while True loop. I recommend using time.sleep() to wait some time between each status poll, otherwise your API costs could get very expensive, pretty quickly. Our code was set to wait for 10 seconds between each poll.
From here, you can return the statuses each time the loop goes around, and raise an error if any fail. When all Transfers are complete, break from the loop. By using Airflow to run the code, you can set the task to re-run any specific Transfer that has failed, and specify the number of retries.
Some extras
While I’ve talked you through how you can approach writing the code to make this operational, there are some quality of life features you can add. In our case, to ensure only the required Transfers were triggered, we added a few filtering options. The filters used are listed below:
-
Platform: Google Ads or Campaign Manager, for example
-
Display name of the Transfer: allows you to only run Transfers that match a pre-determined naming convention.
To use these filters, you can simply write some code that uses the re library. Part of the metadata that is returned from the list_transfer_configs() method is the Transfer display name, and the platform the Transfer is configured for. From here, use re.match to only return the Transfer configs that match a provided regular expression.
The result
Now that the code has been written, you can run Transfers whenever you want to - no more waking up to disappointment when your reporting dashboard hasn’t got up-to-date data. Additionally, thanks to Airflow’s great monitoring solution, you get an incredible overview of your code’s performance along with any issues that require investigation.

About
Sam Kenney
Sam is a data engineer. In his spare time he plays guitar for the UK-based alternative band, Worst Case Scenario.